Install FMOS
Ecosystem Setup
The FMOS Ecosystem Setup process is done using the fmos ecosystem command. Future versions of FMOS may support performing the ecosystem setup process from the FMOS Control Panel browser-based graphical user interfaces, but current versions require using the FMOS command line (e.g. over SSH).
Initial Configuration
Before deploying a multi-server ecosystem, each machine that will be a member of the ecosystem needs to finish initial configuration. This is when basic options such as hostname, network configuration, organization identification, etc. are provided for the machine. As part of this process, the machine is prepared to join the ecosystem by choosing one of the available deployment options.
Initial configuration of an FMOS machine is done in one of two ways, depending on where the machine is hosted: a physical or virtual machine, or a cloud deployment.
When deploying a multi-server ecosystem, choose New Deployment only for the first machine (the database server, which will hold the CA, DB, and ES roles). For all other machines, including standby database machines (if any), choose Existing Deployment.
Initial Configuration Wizard
For FM appliances and other physical hardware servers, as well as on-premises virtual machines, the FMOS Initial Configuration Wizard is used. This wizard is a text-based user interface that is displayed on the machine’s graphical console or monitor, and uses the keyboard for input and navigation.
After FMOS has been successfully installed on the system, the FireMon FMOS Initial Configuration Wizard will start automatically on the first boot. This wizard will guide you through setting the required configuration options in order to use the system.
The FMOS Initial Configuration Wizard has the following deployment options:
-
Single-Server Deployment: This server is the only server in the deployment. It will perform all of the functions of SIP without communicating with other servers.
-
Existing Deployment: This server will be a part of a SIP deployment that already exists in the organization. This option is used for all machines in a multi-server ecosystem except the primary database machine. The specific functions this server will perform will be configured later.
-
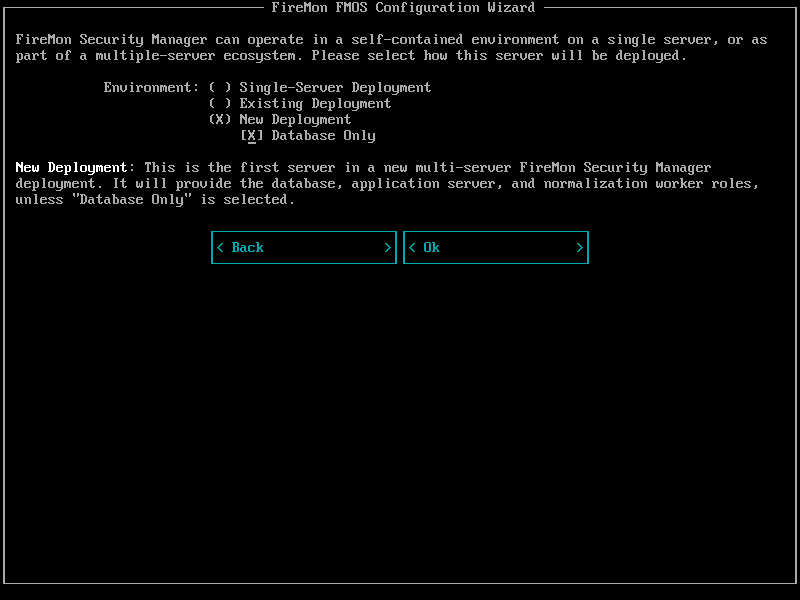
New Deployment: This is the first server in a new multi-server SIP deployment. It will provide the database and application server, unless Database Only is selected.
Be sure to select New Deployment for only the first server in a new ecosystem, and select Existing Deployment for all other servers.
The configuration wizard is organized into several “pages” which contain groups of related configuration options that can be set.
Host and Network Configuration
This page prompts for basic required information for configuring the machine and connecting it to the network.
The host name is the single-label name of the server. It can contain only letters, numerals, and hyphens. It is not typically case-sensitive, but the entered value will be used as-is. The host name should not be longer than 15 characters.
The domain name is the name of the DNS domain to which the server belongs. In many cases, this will match the DNS name of an Active Directory domain or Kerberos realm.
Together, the host name and domain name, when combined with a “dot” (.) character, form the host’s fully-qualified domain name (FQDN). It is extremely important that the FQDN resolve correctly using DNS, and that the listed address matches the primary IP address of the server. The FQDN is used for certificate verification, cluster communication, and several other important network functions.
Network Configuration
All of the network interfaces detected by the system are listed under Network Adapters on the host configuration page. By default, the first detected network adapter is enabled, while all others are disabled. To enable or disable a network adapter, position the cursor in the check box to the left of the adapter name and select the space bar or enter key on the keyboard.
Enabled network adapters are automatically configured for DHCP address assignment. To change this, position the cursor on the Configure button to the right of the network adapter name and select the space bar or enter key on the keyboard. The network adapter configuration page will be displayed.
To change the configuration mode for the selected network adapter, position the cursor on the radio button to the left of the desired configuration mode and select the space bar or enter key on the keyboard. If the Manual configuration mode is selected, the fields below such as IP Address and Subnet Mask become available. Enter the appropriate information in these fields. To save the changes and return to the host configuration page, position the cursor on the Ok button and select the space bar or enter key on the keyboard. The Cancel button will return to the host configuration page without saving any changes.
Although the Default Gateway and DNS Server fields appear on the network adapter configuration page for every network adapter, these are system-wide configuration settings, and can only have a single value. As such, changing the value on one adapter configuration page will change it for all adapters as well.
Network Time
The operation of SIP is very dependent on accurate time information, it is highly recommended to configure FMOS to synchronize its system clock with a network time source using NTP. FMOS supports receiving time server information from the DHCP server (if you configured at least one network adapter for automatic configuration, and your network’s DHCP server provides this information) or specifying the time servers to use manually.
DHCP configuration of NTP sources is enabled by default. To manually enter one or more NTP servers, position the cursor on the Use specific time servers radio button and select the space bar or enter key on the keyboard. The Time Servers field will be automatically populated with the recommended time servers. To specify different servers, position the cursor in the field and select the backspace or delete keys on the keyboard. You can enter more than one server by separating their host names or IP addresses with a space.
Organization
FMOS requires identification information about the organization where the machine is deployed. This information is used to generate X.509 certificates, and helps FireMon support correlate diagnostic information when troubleshooting multiple machines.
-
Name: The name of the company or organization
-
Unit/Department: (Optional) The name of the department, team, unit, etc.
-
City: (Optional) The city/locality of the organization or where the machine is deployed
-
State/Province: (Optional) The state or province of the organization or where the machine is deployed
-
Country: (Optional) The country of the organization or where the machine is deployed
User
At least one user must be created in order to access the FMOS system normally. Enter the desired username for the user, and optionally the user’s full name.
Choose a strong password of at least eight (8) characters, containing at least one lowercase letter, one uppercase letter, one number, and one other symbol (such as !, @, etc.). Repeat the password to confirm you typed it correctly.
Additional users can be created from the operating system command line after initial configuration is complete.
Notifications
SMTP Settings
Several components of SIP and FMOS itself can send notification messages by email. FMOS supports several configuration modes for sending these messages:
-
Delivery Method: Configures how email messages will be delivered to recipients:
-
Send email directly—Email messages will be delivered directly to the mail server responsible for the recipient email addresses, found by querying looking up the MX records in DNS
-
Send email through an SMTP relay—All email messages will be sent to a relay server or “smart host” for delivery
-
Do not send any email—All email messages will be discarded and never delivered
-
-
Relay Host: If Send email through an SMTP relay delivery method is selected, value indicates the host name or IP address of the relay server through which all messages will be sent
-
Port: The TCP port on which to connect to the SMTP server on the remote host
-
Security: Selects the security capability to use when communicating with the SMTP relay server; has no effect on direct email delivery
Only explicit in-band TLS is currently supported. The legacy method of wrapping the entire SMTP communication in an SSL session, known as “SMTPS” is not available
-
Authentication: Selects the authentication method to use when communicating with the SMTP relay server; has no effect on direct email delivery
Only the “plain” authentication mechanism is currently supported. Since this method sends the username and password in clear text, it should only be used when STARTTLS security is enabled.
-
Username/Password: The credentials to use when authentication required for communicating with the SMTP relay server; has no effect on direct email delivery
Deployment Environment
FMOS supports several “ecosystem” configurations, consisting of one or more servers performing different functions. It is extremely important to select the correct deployment option for the system, as making changes later can be difficult. Be sure to plan ahead and decide how many servers will be needed and the roles each one will hold.
-
Single-Server Deployment: This server is the only server in the organization. It will perform all of the functions of SIP without communicating with other servers.
-
Existing Deployment: This server will be a part of a SIP deployment already that already exists in the organization. The specific functions this server will perform will be configured later.
-
New Deployment: This is the first server in a new multi-server SIP deployment. It will provide the database and application server, unless Database Only is selected.
Be sure to select New Deployment for only the first server in a new ecosystem, and select Existing Deployment for all other servers.